Steps for Configuration:
Configure Incoming
Step 1 - Install The SMTP Service
1 Launch the Server Manager.

2 From the Dashboard, click on Add Roles and Features to begin the wizard. Click Next on the first screen.

3 Select 'Role-based or feature-based installation'.

4 Select the server.

5 Click Next to bypass the Roles selections.

6 Scroll down the list and tick the 'SMTP Server' feature.

7 A new window will pop up to inform you that some other services will also be installed. Click Add Features to confirm and continue.

8 Click Next to continue past the features selection screen.

9 Click Install to complete the installation.

10 Click Close when the installation has completed.

Step 2 - Configure SMTP Service
1 Launch the Internet Information Services (IIS) 6.0 Manager.
2 Click Yes to the UAC Prompt.

3 Right-click on SMTP Virtual Server #1 and select Properties.

4 Select the General tab and change the IP Address to the server’s IP address.

5 Select the Access tab and click on the Connection button.

6 In the Connection window, select 'Only the list below' and click the Add button.

7Add the IP address, Group of computers or Domain of the devices permitted to use the internal SMTP, then click OK.

8 In the Access tab of the Connection window, click the Relay button. Add the same permitted devices to the Relay Restrictions list.

9 In the Delivery tab of the Connection window, set an external domain.

10 Launch the Windows Firewall with Advanced Security console.
11 Right-click on 'Inbound Rule' and select 'New Rule' to begin the wizard.

12 Select 'Port' and click Next.

13 Set the local port to 25 and click Next.

14 Choose 'Allow the connection' and click Next.

15 Uncheck 'Public' to prevent external access to the server. Click Next.

16 Give the rule a name, and click Finish.

17 You should now see a new rule enabled in the firewall management console.

18 In the Server Manager, click on Tools and select Services.

19 In the Services window, double-click on 'Simple Mail Transfer Protocol (SMTP)'.

20 Stop and then Start the service. Set the Startup type to Automatic.

20 Click OK to finish. The internal SMTP service is now ready and listening.
Step 3 - Set SMTP Service to Start Automatically
Install the SMTP service
Configure the SMTP service
Set the SMTP service to start automatically
Configure outgoing email for a farm by using Central Administration Configure Incoming
Step 1 - Install The SMTP Service
1 Launch the Server Manager.

2 From the Dashboard, click on Add Roles and Features to begin the wizard. Click Next on the first screen.

3 Select 'Role-based or feature-based installation'.

4 Select the server.

5 Click Next to bypass the Roles selections.

6 Scroll down the list and tick the 'SMTP Server' feature.

7 A new window will pop up to inform you that some other services will also be installed. Click Add Features to confirm and continue.

8 Click Next to continue past the features selection screen.

9 Click Install to complete the installation.

10 Click Close when the installation has completed.

Step 2 - Configure SMTP Service
1 Launch the Internet Information Services (IIS) 6.0 Manager.
2 Click Yes to the UAC Prompt.

3 Right-click on SMTP Virtual Server #1 and select Properties.

4 Select the General tab and change the IP Address to the server’s IP address.

5 Select the Access tab and click on the Connection button.

6 In the Connection window, select 'Only the list below' and click the Add button.

7Add the IP address, Group of computers or Domain of the devices permitted to use the internal SMTP, then click OK.

8 In the Access tab of the Connection window, click the Relay button. Add the same permitted devices to the Relay Restrictions list.

9 In the Delivery tab of the Connection window, set an external domain.

10 Launch the Windows Firewall with Advanced Security console.
11 Right-click on 'Inbound Rule' and select 'New Rule' to begin the wizard.

12 Select 'Port' and click Next.

13 Set the local port to 25 and click Next.

14 Choose 'Allow the connection' and click Next.

15 Uncheck 'Public' to prevent external access to the server. Click Next.

16 Give the rule a name, and click Finish.

17 You should now see a new rule enabled in the firewall management console.

18 In the Server Manager, click on Tools and select Services.

19 In the Services window, double-click on 'Simple Mail Transfer Protocol (SMTP)'.

20 Stop and then Start the service. Set the Startup type to Automatic.

20 Click OK to finish. The internal SMTP service is now ready and listening.
Remember to add this new SMTP server as a legitimate relay if your mail domain is using (SPF) Sender Policy Framework.
Step 3 - Set SMTP Service to Start Automatically
1 Click Start, point to Administrative Tools, and then click Services.
3 In the Simple Mail Transfer Protocol (SMTP) Properties dialog box, on the General tab, in the Startup type list, select Automatic.
4 Click OK.
Step 4 - Configure outgoing email for a farm by using Central Administration
Open the SharePoint 2013 Central Administration and go to System Settings and Click Configure outgoing e-mail settings.


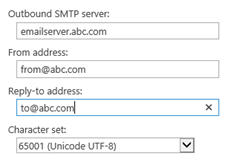
Click the email settings to configure the outgoing email server. Set the Outbound SMTP server to your email server. From address to any email address that should display in the from email and Reply-to address as reply email.

Thats it on outgoing email setting.. see you soon with some other useful blog.

Thats it on outgoing email setting.. see you soon with some other useful blog.

No comments:
Post a Comment